


Theme Editing Basics
Hi one and all! We have written this little tutorial to help those newer RapidWeaver users get to grips with the basics of theme editing. It is a question much asked on the RealMac Forum, and holds the answer to many other questions indirectly. We were using RapidWeaver 3.6.7 (from now referred to as RW) on MacOS 10.4.11, but this should hold fine for many other versions too. Follow the comments on this in the Forum HERE. (We now use RapidWeaver 4 on MacOS 10.5.6, and comments show most differences.)
Quick Start!
For those who like to dive in first and read the detail later, just read this!
1) Open RW and open a project.
2) For RapidWeaver 3.6.x, click on the button in the bottom right of the main edit window, just to the left of the Publish button. This opens the Theme Selector. For RapidWeaver 4, click the Themes button at the top of the edit window.
3) Choose the theme you wish to edit, right (control) click on the theme, choose 'Duplicate Theme" and re-name it appropriately.
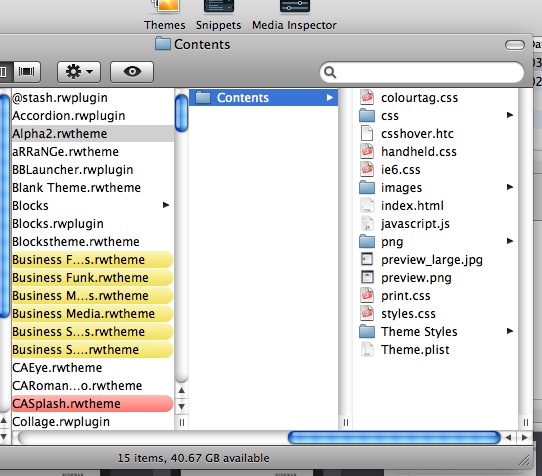
4) Right click this new copy and choose 'Show Contents' (3.6.7) or 'Display Contents In Finder'(4.x).
5) You now have access to the style.css (for overall look, fonts, borders etc.), the index.html (RW's template for positioning and more) images included in the theme and more.
6)You will need to save your edits and get RW to preview again to see the effect of most changes
Our Quick Do's and Don'ts.
a) When editing a theme, always work with a duplicate (instructions on duplicating above).
b) Name it according to the intended project (or maybe look) to make things easier in the long run. Using the same edited theme for more than one project can have you undoing your own work!
c) Edits done to the styles.css if put at the end, can be copied into an updated theme's styles.css easily rather than repeating all the work again. Some edit the index.html to point at a replacement stylesheet, but this doesn't make it as easy to take advantage of a theme upgrade, as many of the upgraded elements might be in the styles.css
Themes vs Plugins
Themes are pre-constructed looks for RW websites, and RW comes with several built in. Visit the Add Ons section of the Realmac site to get yourself a large list to choose from, quite a few of them free! Themes control the look of many components and can have extras built in (dual/split navigation, 3 columns and many more) but must not be confused with Plugins. These give RW different page types, which add ways RW can generate and control content.
Tools (Applications)
These are listed in the sidebar. Our main tools used when editing themes are:-
CSSEdit 2 by MacRabbit for css files. You can use TextWrangler by Barebones too.
TacoHTML Edit by Taco Software for the index.html.
PrefSetter by Night Productions for theme.plist files.
We use various image editing software for making custom header images etc. too including Adobe Photoshop Elements and Art Text. RWMultitool can make light work of matching your images to the requirements of a theme.
PrefSetter and Text Wrangler are freeware. TacoHTML is not free, but a great HTML and PHP editor.
CSSEdit is not, but is fantastic value for money, and allows you to write css code through menus and checkboxes, 'x-ray' pages to find the css class needed to change the look of something and more.
Espresso also by MacRabbit can do all the above in one slick interface, but is early in it's life and on the way up! It even has a full FTP client. At just shy of €60, it may be more than most wish to spend.
There are many other options, these are just the ones that suit us!
Theme Choice
This could have us all putting forward different views for a month! Our main objectives in theme choice are driven by what we can change easily and what takes more work.
We don't choose a theme as the colour choice on the demo site was what we were after, but the navigation is in the sidebar and we want it horizontal across the top of the page. The colours are generally easy to change (many themes let you change some colours in the Page Inspector now) but restructuring the navigation is a complicated and sometimes frustrating task.
After a few bits of theme editing, you will get a feel for which tasks you want to take on, and which you want sorted from the start.
Duplicate The Theme
As in the first steps of the 'Quick Start' section, we need to duplicate our chosen theme. Start RW and open a project (maybe a 'test' or 'working' project). Open the theme selector by clicking on the button in toolbar at the top of the main edit window. We now choose the theme we want to edit, right (control) click on it, and from the menu select 'Duplicate Theme'.
Choose your name carefully. We rename our themes with abbreviations of the project and the theme.
Going Deeper...
Now we can right click on the new copy of the theme, and select 'Show Contents'. We now have a finder window open with the theme's contents on show. You will see several files and folders, we will now describe some of what can be achieved editing some of these.
styles.css (or style.css)
This is often people's first target inside the theme. Open this with CssEdit (double click if you have it installed and it will usually open in that), TextWrangler or similar. Note that if you want to use Text Edit, you will need to select plain text mode. Looking down the file you will see all the areas it addresses. In CSSEdit it will give you Classes on the left, code in the middle, and selectors and menus to change the code on the right.
h1 class will define your site title look in most themes, while h2 will be for the slogan.
#content will change the look of the content (well I never!) and there are plenty more. Not all themes have all the same classes. W3Schools have a great set of online tutorials to get you through the basics of css, Better than that is a book (electronic download) by the awesome Sundog called RWcss. We have our copy, and it's well worth the price. Those of you from the Realmac Forum will be familiar with his great attitude and knowledge.
index.html
Open this with TacoHTML or TextWrangler (right click and chose 'Open With'). This is the html template for each page. RW then replaces each label with '%' around it with the parts of your project. breadcrumb with the % tags for the breadcrumb container (can't write it with tags as displays the breadcrumb container right where it's written!), %custom_header% for things placed in the header section of the Page inspector and so on. Moving these components inside the index.html will move these components around your final web page. A bit of 'trial and terror' can teach you a lot. W3Schools tutorials on html can help too. TacoHTML can write a lot of tags for you from menu choices, and this can help you learn more of them too. For a free program, we are very impressed with it.
Theme.plist
Open this with the free PrefSetter or your favourite equivalent. These are the preferences of the theme, showing the options it has available inside RW and more. Near the bottom you will notice the 'short name' of the theme. This will also be the folder name inside the rw_common > themes folders in your published website.
css folder
The css folder contains the small css documents included when certain theme options are employed. They supersede (override) the style.css and might move the sidebar to the right or hide it for example. Edit these to change what the relevant theme options achieve.
Images Folder
This houses the images used in the theme, such as buttons, header images, background images and sometimes more. RWMultitool and RWMultitool Lite are used by many for an easy way to get your own images to replace those in the theme by matching them in size and type with the original before replacing.
That's it for now!
There are many other things that can be done with theme editing (construction of your own themes), but this is only a basics tutorial we have tried to keep reasonably brief (not sure we did). Many thanks to the people who have helped us learn on the RealMac Forum, particularly Larry aka Sundog, Ed Brenner, Warrender (Phil), John @ Loghound, John @ AOIMedia, Isaiah @ Yourhead, kbbrux and many more.