Rollover Logo (or Header Image)
Hi All! This is a simple and short tutorial showing you some basic code, that can be used to control a logo (or header image) that changes with mouse hover and also acts as a link, possibly to your homepage. We are taking the assuption that this will be inserted into a RapidWeaver project, but (with some tweaking if necessary) this should work in other weaving software too. Workflow. In the following solution, this will be the basic workflow.◦ 1) Place the images in the correct place for the solution.
◦ 2) Adjust the code to suit the images and theme used in the site.
◦ 3) Place the code into your RapidWeaver project.
Solution A - Warehousing.
1) Images in Warehouse Folder
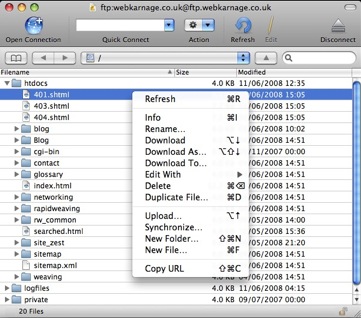
Here we are using another program to upload the images to our server. We are using an initial image called logo_1.jpg and a mouse hover image called logo_2.jpg. Our program of choice here is Cyberduck. This is a donationware ftp client. There are other options, such as Transmit and Fetch. With any of these programs, we can take a look at the files on our server, and navigate to the folder our website is uploaded to, known as our ‘Site Path’. In here, we will now create a new folder, and call it ‘images’. inside this folder, we are placing our 2 images, logo_1.jpg and logo_2.jpg. The image shows Cyberduck as we right-click in order to make a new folder. As you can see, the ‘Site Path’ for my site here is ‘htdocs’. Make sure you are putting the folder in the same directory as your home page file ‘index.html’ as that must be in the root directory of your site.
2) Adjusting the code.
Here is the basic code we are going to use.We now have to adjust this code to suit. A good way to do this, is to paste it into a new HTML page type in your project. The preview will then show you the logo. First in the code is the link activated by the mouse click. this is set to your first page in the site, but you can change that to your preference. The images are referenced with full urls, as otherwise the logo will not display in the RapidWeaver preview. Replace the ‘www.yourdomain.com’ with what is appropriate for your website, and if your images are named differently, adjust the filenames in the code too. The height and width should reflect those of you images. If this isn’t correct for what you need on the site, re-size the images first, and then adjust the code to suit the new sizes.<a href="/index.html"><img id= 'logo'
onmouseover= "this.src='http://www.yourdomain.com/images/logo_2.jpg';"
onmouseout= "this.src='http://www.yourdomain.com/images/logo_1.jpg';"
style= "border:0px; margin:0px; padding:0px; background-color:transparent; border-style:none;"
class="ImageStyle"
alt="logo"
src="http://www.yourdomain.com/images/logo_1.jpg"
width="393" height="85"
name="logo" /></a>
We have styling included in the code, and margins are an easy way to psition this logo. If you have four values for the margin (we have one at the moment, which is then applied to all four sides) they will change the top, right, bottom and left margins respectively. As this is ‘in-line’ styling, it overrides that in the styles.css of the theme you are using. The name can also be changed in the last line, this shows up when you hover the mouse over the logo.
3) Placing the code
This code was developed to be placed in the slogan field of the Page Inspector of RapidWeaver, but this isn’t the only place it can be deployed. It should work very well in an html block in a Blocks page too, with the advantage (if required on every page) over using a normal image block of using one copy of the each image for the whole site. Most browsers will cache the images, reducing both load times and bandwidth used over using a normal image block on each page. If you are placing it in the conetnt area of a Styled Text page, or in a Styled Text sidebar, be sure to select the code and apply ‘Ignore Formatting’.Solution B - Inside Your Theme
1) Images into the Theme.
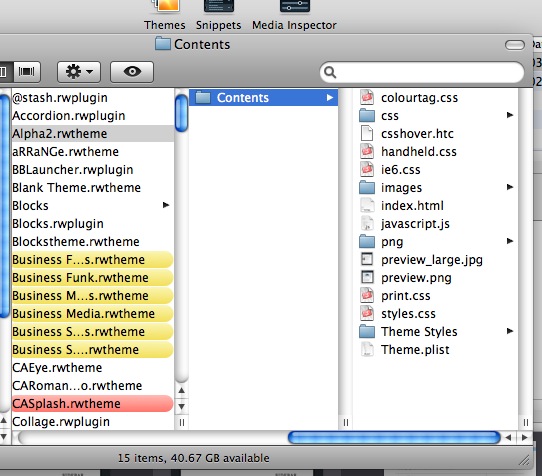
Right click on the theme copy you are using, and select ‘Show Contents’ in RapidWeaver 3.6 or ‘Reveal Contents in Finder’ in RapidWeaver 4. Inside the theme, you will see an ‘images’ folder, this is where we need to place our images. For this we call the initial image logo_1.jpg, and the rollover image logo_2.jpg, and we drop them into this folder. If when you drop your images into this folder, the finder asks you if you want to replace another image, please click cancel and rename your images before doing this again, or these images may turn up in an unexpected place in your site!!
2) Adjusting the code.
Here is the basic code we are going to use.We now have to adjust this code to suit. A good way to do this, is to paste it into a new HTML page type in your project. The preview will then show you the logo. First in the code is the link activated by the mouse click. this is set to your first page in the site, but you can change that to your preference. The images are referenced with the ‘pathto’ reference that RapidWeaver understands for any file inside the contents of your theme. If your images are named differently, adjust the filenames in the code to match. The height and width should reflect those of you images. If this isn’t correct for what you need on the site, re-size the images first, and then adjust the code to suit the new sizes.<a href="/index.html"><img id= 'logo'
onmouseover= "this.src='%pathto(images/logo_2.jpg)%';"
onmouseout= "this.src='%pathto(images/logo_1.jpg)%';"
style= "border:0px; float:left; margin:0px; padding:0px; background-color:transparent; border-style:none;"
class="ImageStyle"
alt="logo"
src="%pathto(images/logo_1.jpg)%"
width="393" height="85"
name="logo" /></a>
We have styling included in the code, with float and margins an easy way to help position this logo. If you have four values for the margin (we have one at the moment, which is then applied to all four sides) they will change the top, right, bottom and left margins respectively. As this is ‘in-line’ styling, it overrides that in the styles.css of the theme you are using. The name can also be changed in the last line, this shows up when you hover the mouse over the logo. We have included the float:left here as we will be giving more than one option for placing the code!
3) Placing the Code.
 Taco HTML
 TextWrangler
Please be aware, that the theme chosen can have large effects on how this operates, and it is possible to have a theme without a page_header area in the index.html at all. We cannot cover every possible result here, but feel free to request further help in the thread HERE in the Realmac Support Forum, or get in touch! Hope it’s useful to you.
WebKarnage.